If you’re looking for an easier way to receive ETH this is the article you’ve been looking for.
In it I’m going to let you know the steps you can take to secure your own .eth domain, which will allow you to receive ETH to the wallet of your choice. Instead of having to share a long string of random numbers and letters you’ll be able to share a simple and understandable .eth domain name.
For example, we’ve registered bureaupay.eth. You can send Ether, the token used on the Ethereum blockchain, directly to us through this domain. Before we do this, let's quickly refresh your memory about Ethereum Domain Names.
What is an Ethereum Domain Name?
The Ethereum Name Service is a secure an decentralised human readable Ethereum address routing system. One can think about it as a decentralised cousin of the established Domain Name routing (DNS) system of today.
It will create a system that will map human readable Ethereum addresses to the numeric versions that we are familiar with. The ENS was launched on the Ethereum main net in May last year and since then, it has become wildly popular and many domains have been traded in the community.
In a nutshell, the process of buying and using an .eth domain is similar to buying and using a domain for a website. The difference is that instead of using the domain to host a website you use it to receive Ether.
How to Register an .eth Domain
Unlike registering a website domain there are a few more steps to registering an .eth domain. Don’t worry though, it isn’t too complicated, and I’ve got all the steps listed for you below to make the process of registering your first .eth domain as quick and easy as possible.
First: Create a wallet at MyEtherWallet
You’ll need a public key to assign your domain to, so the first thing you’ll need is a cryptocurrency wallet. If you have a wallet already you can skip this step and use an existing wallet, but you will have to access it from MyEtherWallet.
To do that go to MyEtherWallet and click the link in the upper left that says “New Wallet”.
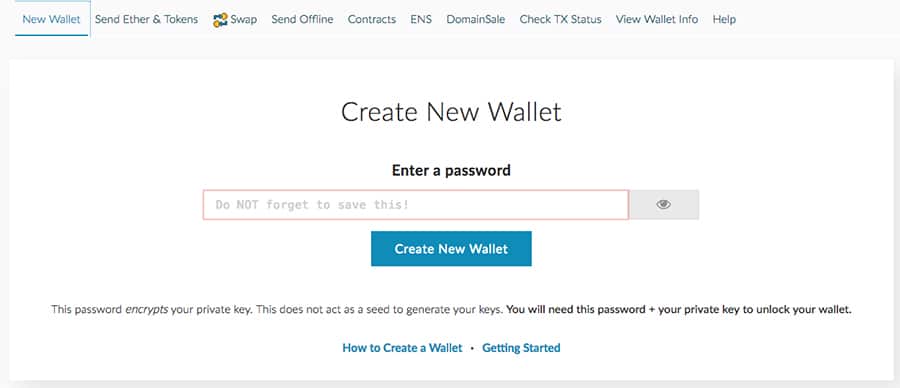
Creating a Wallet on MyEtherWallet
Follow the instructions, and be sure to download your Keystore file when prompted. When you get to the end of the process you’ll get your private key for accessing your wallet. Keep this private key safe and secure. You can unlock your wallet at this point by entering the private key or by uploading the Keystore file.
Second: Bid on your .eth Domain
Now that you have a wallet its time to get your .eth domain.
This begins at the ENS section of MyEtherWallet. This is where you can search .eth domains and see if they’re available.
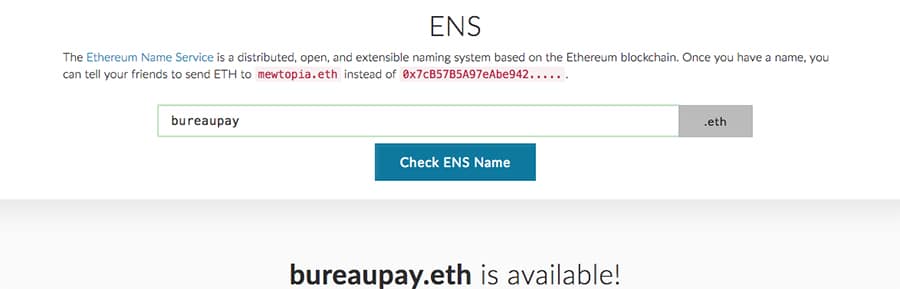
Enter domain and check if available.
Note that as of August 2018 you can only bid on domains that are a minimum of seven characters long. There are plans to allow for shorter domain names in the future.
If your domain is available you’ll get a message telling you so. If not it will tell you the domain is already owned. To bid on the domain begin by entering your private key or Keystore file (or other accepted method).
This will access your wallet and take you to the screen for bidding on .eth domains which is in the below image.
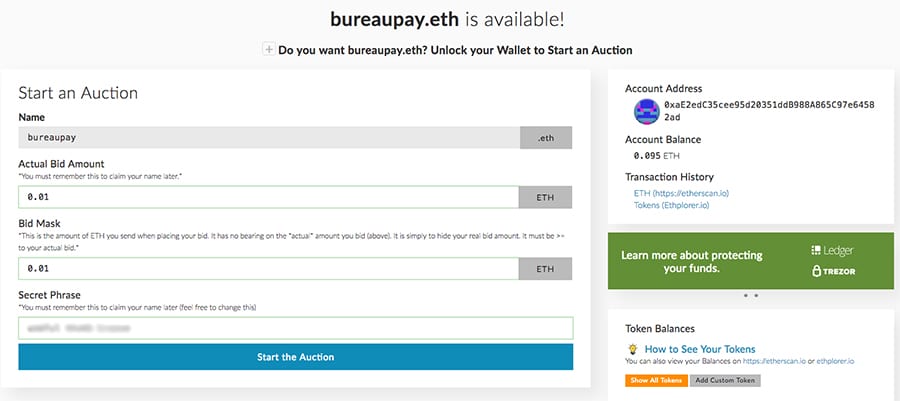
Enter bid parameters for .eth domain name
You’ll need to fill in the following three fields:
- Actual Bid Amount: the maximum amount of ETH you’re willing to pay for the domain. If you win you’ll only pay just above the second highest bid and the remainder will be refunded.
- Bid Mask: the amount of ETH sent to the smart contract that can be publicly seen as your bid. This must be greater than or equal to your actual bid. This means that you could make it look like you’ve bid a lot more than you have (you will need to have these funds in your wallet).
- Secret Phrase: this is a password used to help secure the transaction. Write this down and don’t lose it.
Once these three fields are filled you can press the button to “Start the Auction”. You’ll get a message with all the details of your bid and some text in a box that will instruct you to “Copy and save this”. Make sure you do. You might even want to take a screenshot. Then click the “Yes, I am sure! Make transaction” button.
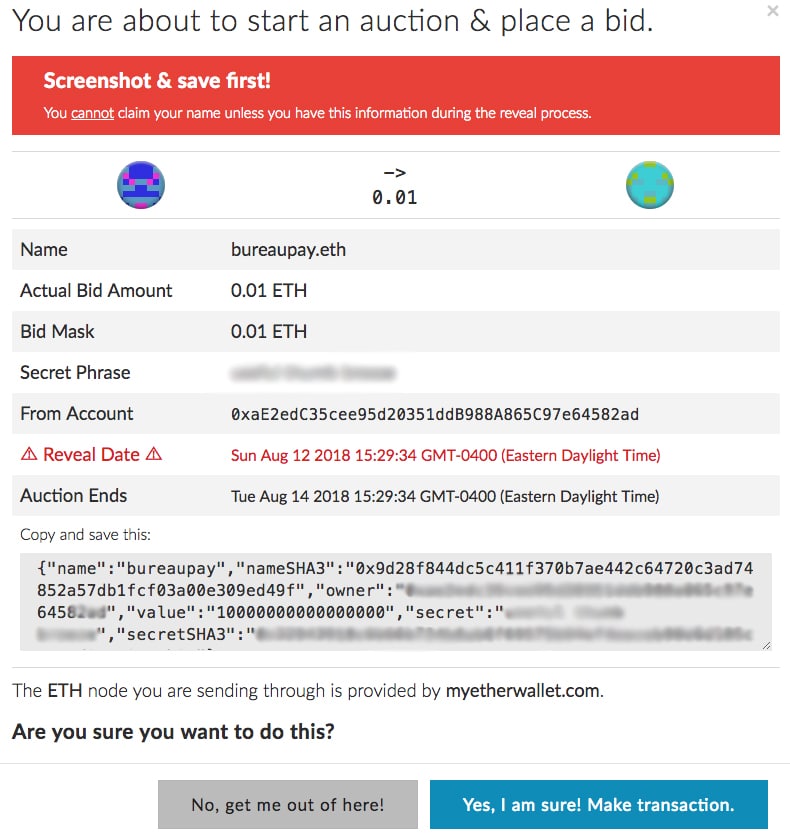
Confirmation Screen for .ETH domain name
That starts the auction and your bid is in. The auction lasts three days, during which time others can also bid on the domain. After the three days everyone reveals their bid and the winner is determined. More on that later.
Third: Make sure the Transaction was Processed
Call me paranoid, but I like to make sure everything worked as planned. This means double-checking to see if the bid was processed. You do this at Etherscan.io where you can search the .eth address. Below is the example of our bureau.eth domain.
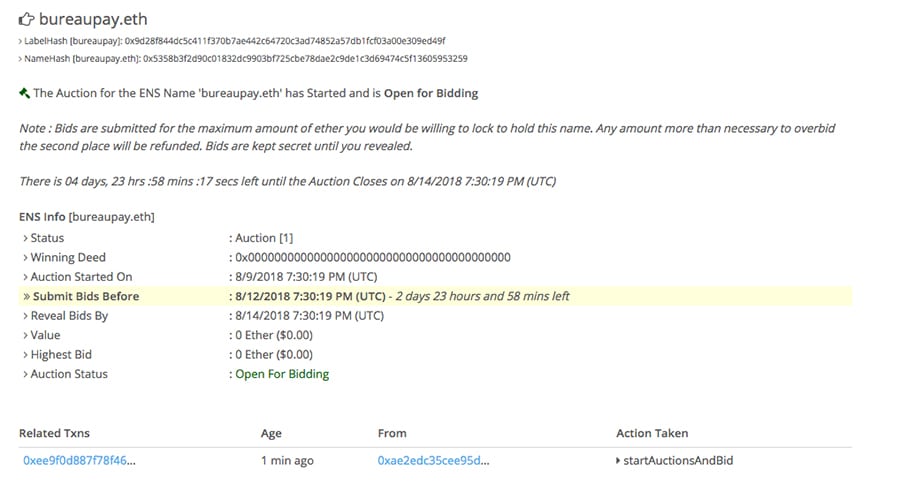
Confirmation of the Bid on the Blockchain
You’ll get the details of the auction and at the bottom you should see a list of transactions, including yours which will show the Action Taken as “startAuctionandBid”. Note that it could take 5-10 minutes for the details to show up.
Fourth: Reveal Your Bid
After the three days have passed and the auction ends everyone must reveal their bids within 48 hours. If you don’t reveal you lose the auction and all of the funds you bid.
To reveal your bid go back to the ENS section of MyEtherWallet and search your domain like you did when you first placed a bid. You’ll get a message back telling you it’s time to reveal your bid.
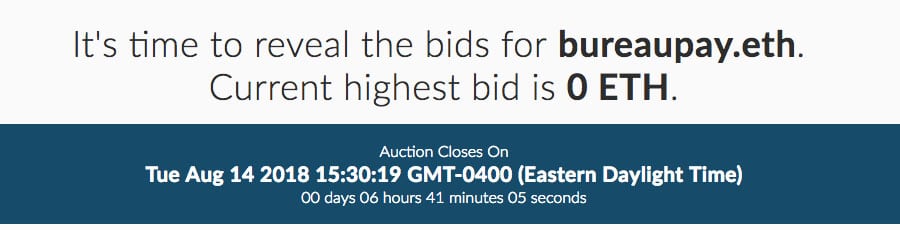
Revealing Bid in ENS section of MEW
To reveal the bid log into MyEtherWallet with your login details and you’ll then be prompted to enter the bid details. This is the information you copied and/or screenshot when you placed your bid. Once the details are entered click “Reveal your Bid” to make your bid public.
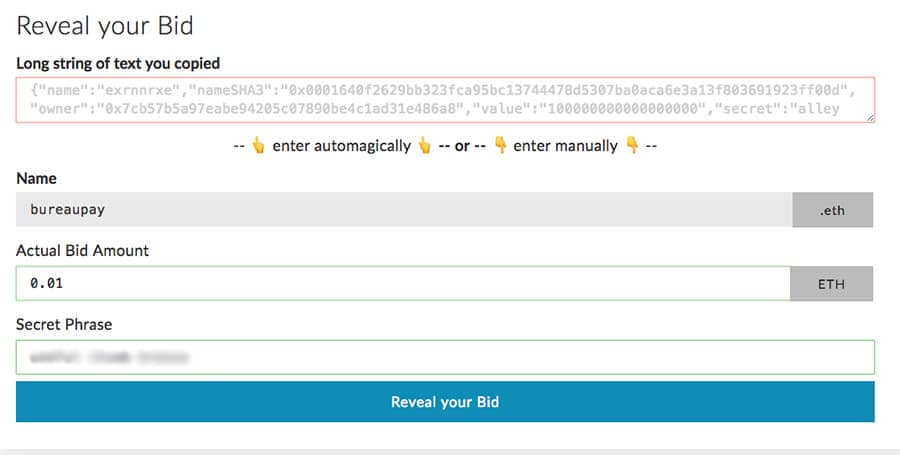
Confirmation of bid details
This reveal stage lasts for 48 hours. If you’re still the highest bidder at that time you win the auction and the domain is yours!
Fifth: Check to verify your reveal was Processed
Since you have to wait 48 hours anyway it’s worth it to take the time to make sure your reveal was processed. Go back to Etherscan.io and search for your domain.

Domain moved to reveal stage on etherscan.io
You’ll see the domain has moved to the “Reveal Stage”, how long is left in the Reveal Stage, and your transaction that will show the “unsealBid” action.
Sixth: Finalize the Auction
Once the Reveal Stage ends it will be ready to finalize. To do this go back to the ENS section of MyEtherWallet and search for your .eth domain. You’ll get a message stating “Is that your address? Finalize the auction to claim your new name.” Below will be options for accessing your wallet.
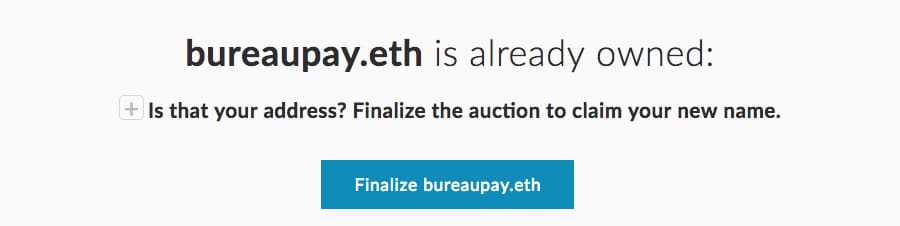
Finalising your domain auction on MEW
Make sure you use the same wallet you used for the bid and once it’s unlocked you’ll get a message to “Finalize xyz.eth” (where xyz is your domain name). Click the button to finalize. Next you’ll get a confirmation prompt where you should click “Yes, I am sure! Make Transaction”.
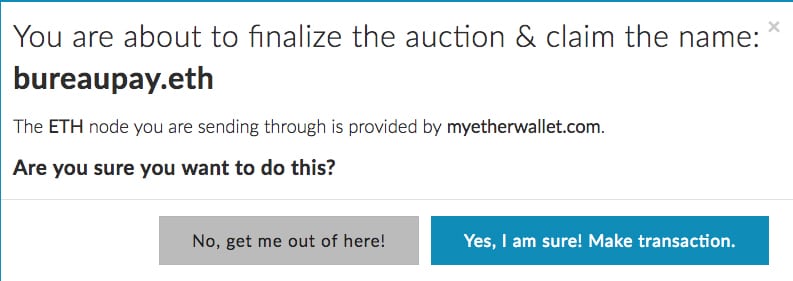
Confirmation of Finalisation on MEW
You can go back to Etherscan.io to confirm the transaction went through. You should see an transaction at the bottom with an action of “finalizeAuction”. It may take 5-10 minutes for the transaction to show up.
Seventh: Set the Resolver
The domain is now yours, and all that’s left is to assign it to your wallet address. This is a fairly quick process and is like pointing a web domain at nameservers.
Start by going back to the ENS section of MyEtherWallet and search for your domain. You should get a message stating “Is that your address? It is ready to set up a resolver.” as well as instructions for doing so at the bottom of the page. Keep the instructions open in a tab of your browser.
Open a new tab and go to the View Wallet Info section of MyEtherWallet. You’ll need to log in with your public and private keys and you’ll get a message “Your Address”. Copy that address and go back to the previous tab to paste it into the field labeled “Enter the address you would like this name to resolve to:”.
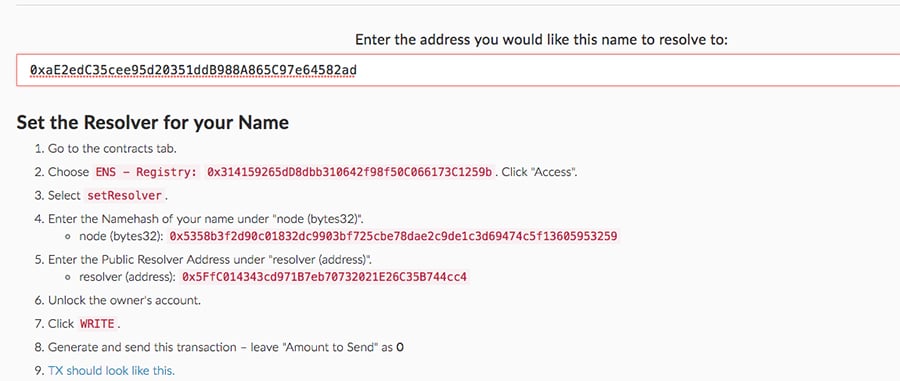
Setting address for ENS resolver
In another new tab open the Contracts section of MyEtherWallet. On the right you’ll find a drop-down menu where you’ll want to locate and select ENS- Registry. The other fields should auto-populate.
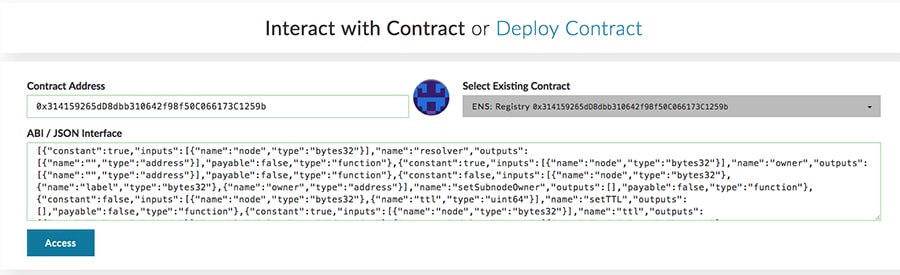
Deploying contract with ENS registry settings on MEW
Press “Access” and a new box will appear below. From the drop-down menu marked “Select a function”, choose “setResolver”.
You now need to fill in the “node bytes32” and “resolver address” fields. You’ll find the information you need to put in these fields in the ENS section of MyEtherWallet, which you should still have open in another tab. Paste these details in and then unlock your wallet with your public key.
Finally, press the “WRITE” button.
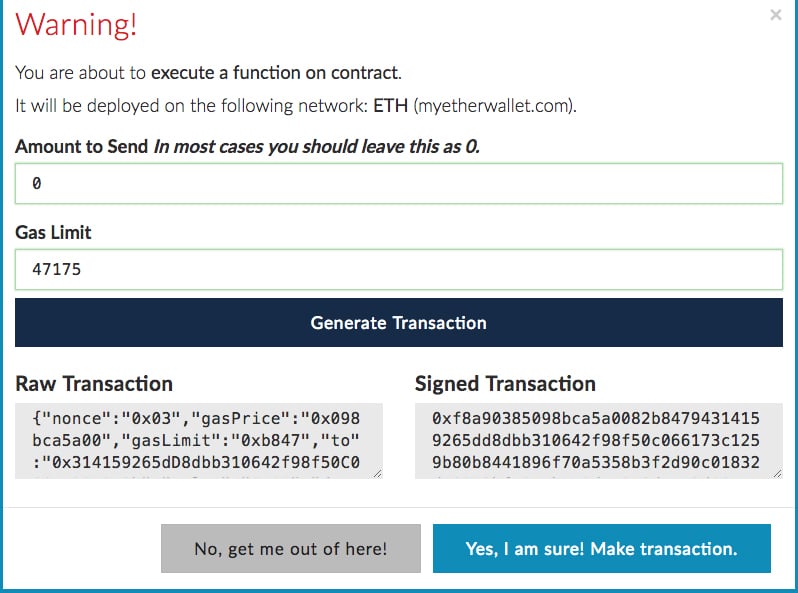
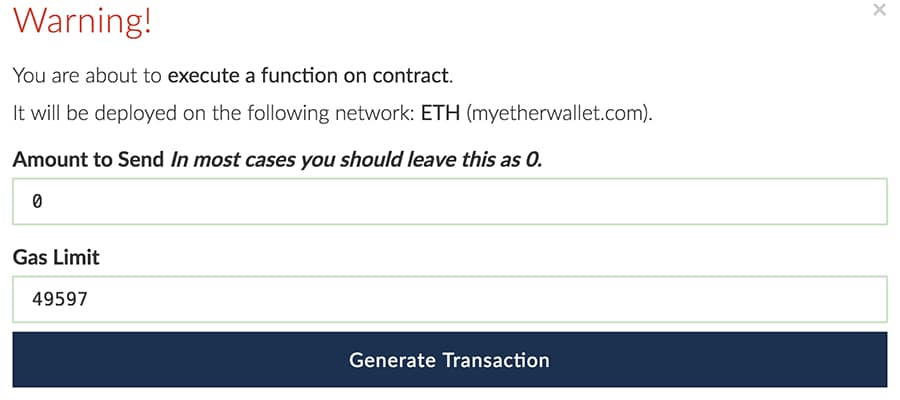
Confirmation of contract execution on MEW
You’ll get a warning pop-up. Don’t worry — leave the amount as 0 and press “Generate Transaction”.
You’re almost done.
Eighth: Setting the Address
Wait several minutes before doing this final stage to ensure the previous transaction has gone through.
Go back to the Contracts section of MyEtherWallet and select “ENS – Public Resolver” from the drop-down and then press “Access”.
In the next section go to the “Select a Function” drop-down and choose “setAddr”. As before fill in the “node bytes32” field and the “addr address” which is your public address. After you fill in the fields unlock your wallet with your private key.
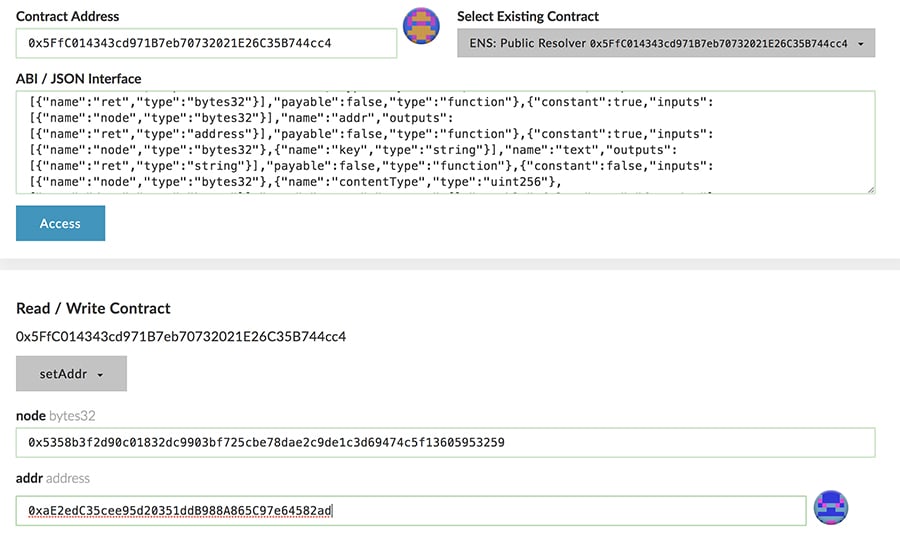
Setting address in MEW
After unlocking your wallet press “WRITE”. There will be another warning message. Leave it as is and press “Generate Transaction”.
Generate Transaction in Final Step
After a couple minutes you can check on Etherscan.io and you should see the Name Info and Reverse Name Lookup has been added. You can now test by sending a small amount of ETH to your new domain. If it works you’re good to go!
Conclusion
Moving forward the Ethereum Name Service is working on building a new dApp to handle all of the ENS related tasks. This will streamline the process of managing .eth domains as currently these tasks are handled by disparate websites and applications.
There are also plans to improve usability of the system, and to expand the ENS library to make it easier for developers to integrate ENS functionality.
The current auction system is an interim solution, and the intent is to have a permanent registrar by May 2019. There are ongoing discussions on how this will be handled and what features will be included at the ENS Discussion Forum.
While owning an .eth domain certainly isn’t a necessity, we think it makes working with Ethereum addresses much easier and was a logical step for more wide-spread usage of the network.
Featured Image via Fotolia